Introduction
One security-related topic that is almost never discussed in courses, such as CPTS or OSCP, is email security. There is almost always a phishing exercise, but it never goes more than that. You never get to learn why the spoofed email was accepted in the first place and what could be done to prevent it.
This is somewhat strange given that phishing remains one of the most common methods for obtaining an initial foothold in an environment!
Image taken from here.
In addition, it is also a common day-to-day pentesting task, typically, a part of an external assessment. Why no course with the goal of “preparing” you for landing your first pentesting job bothers to talk about it?
I had a thorough research and there aren’t many resources (or tools!) about how to go about an “email configuration review”, so I thought: why not create one myself?
So here we are!
TL;DR on DNS
Before discussing the fun stuff (SPF, DKIM, and DMARC), we need to briefly talk about the Domain Name System (DNS).
DNS’s primary purpose is to translate human-friendly domain names (e.g. kairos-sec.com) into IP addresses that computers can use to communicate.
However, DNS is not limited to storing IP addresses. It can also store many other types of information, including mail routing instructions, domain ownership validation records, and email security policies. This information is stored in DNS records; some of the most common record types are shown below:
| Record | Purpose |
|---|---|
A | Maps a domain name to an IPv4 address |
AAAA | Maps a domain name to an IPv6 address |
CNAME | Creates an alias to another hostname |
NS | Specifies the authoritative name servers for a domain |
MX | Identifies the mail servers responsible for receiving emails |
TXT | Stores arbitrary text information (e.g. SPF, DKIM, and DMARC policies) |
For our purposes, the most important record types are: A, MX and TXT. As an example, we can inspect the DNS records of the kairos-sec.com domain:
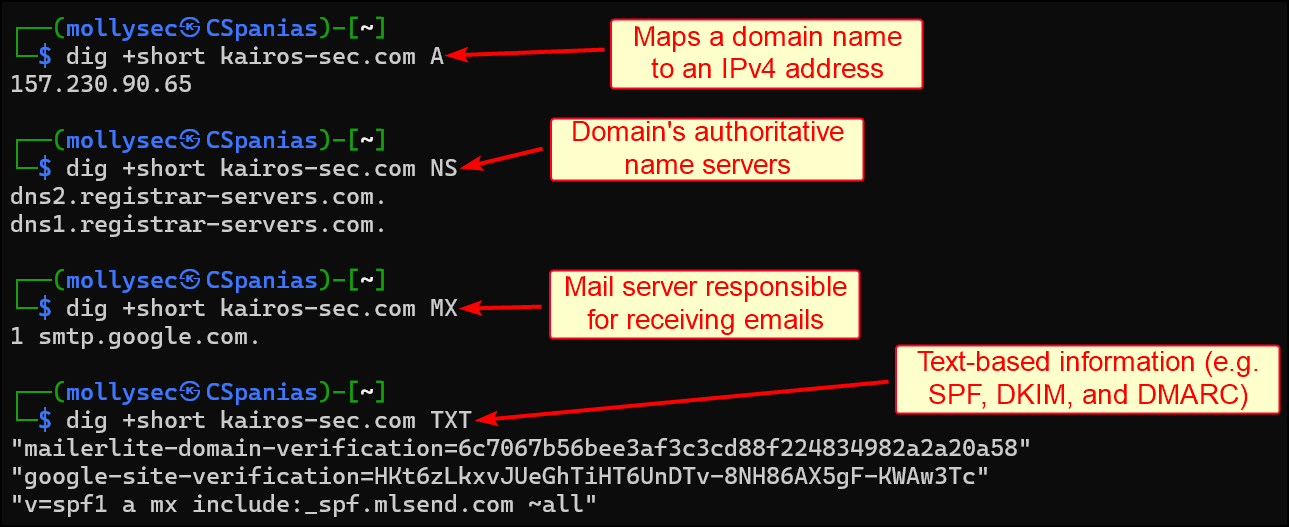
The detail-oriented readers out there have probably noticed that although I have listed (twice now!) SPF, DKIM, and DMARC under the TXT record, only the SPF is showing on the above screenshot. This is because SPF is typically published directly under the root domain, while DKIM and DMARC are usually stored under dedicated subdomains.
But more on that later. Let’s dive in!
Email Authentication
SPF
The Sender Policy Framework (SPF) is a DNS TXT record published by a domain owner that specifies which servers are authorised to send email on behalf of the domain. An SPF record would typically consist of the following parts:
| Component | Meaning |
|---|---|
v=spf1 | SPF version identifier |
ip4:x.x.x.x | Explicitly authorised sending IPs |
include:<domain> | Authorised third-party mail providers |
[-/~/+]all | Policy for unauthorised sending mail servers |
From a security perspective, we are primarily interested in the all component, as it defines what happens when a sender is not listed in the SPF record. The following three policies are available:
| Value | Behaviour | Use case |
|---|---|---|
-all | Reject unauthorised senders (Fail) | Domains with a fully identified sending infrastructure |
~all | Mark unauthorised senders as suspicious (SoftFail) | Common when sending sources are not yet fully known |
+all | Allow all senders (Pass) | Testing, backwards compatibility, or (more commonly) misconfiguration |
In practice, many organisations choose to use ~all and never transition to -all. This is done to reduce the risk of blocking legitimate emails originating from forgotten third-party services (e.g. marketing, recruitment, or ticketing platforms) that have not yet been included in the SPF record.
Now that we understand what the SPF record does, let’s see how a receiving mail server uses this information when processing incoming messages. We will use the domain of our favourite pentesting company, kairos-sec.com, to see how this works in practice.
Let’s start by having a look at its TXT record:
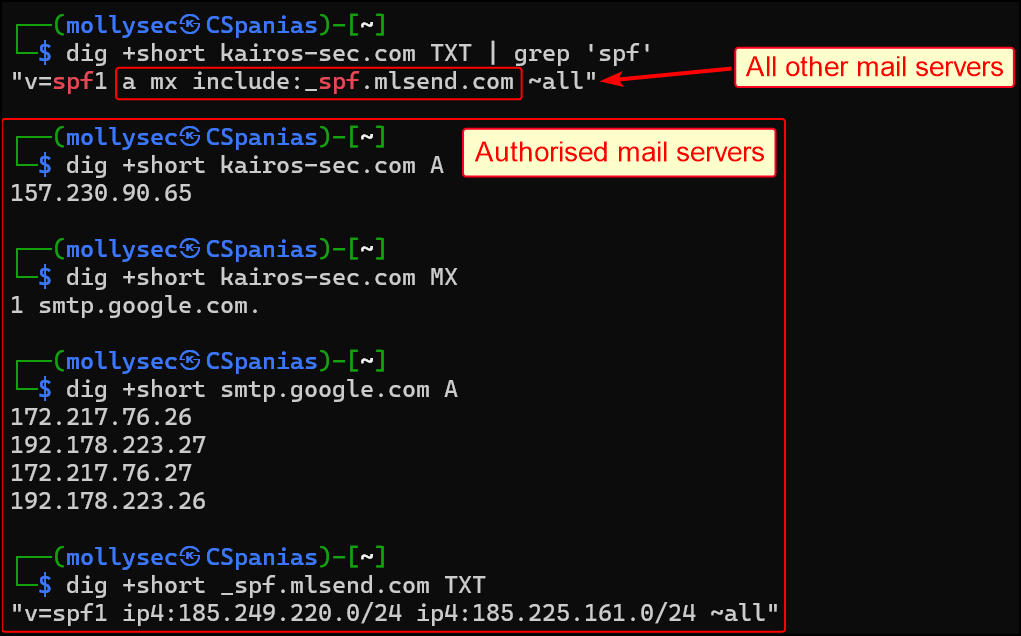
The above TXT record shows a list of mail servers that are authorised to send email on behalf of kairos-sec.com. It also shows what happens when an email is sent by a server that is not included in that list; in this case, due to its SoftFail policy, it will probably be flagged as spam.
Notice that evaluating a single SPF record often requires multiple DNS lookups. In our example, the
a,mx, andincludemechanisms all trigger additional queries. To prevent excessive DNS resolution, SPF evaluation is limited to a maximum of 10 DNS lookups. Once exceeded, SPF evaluation results in aPermError.
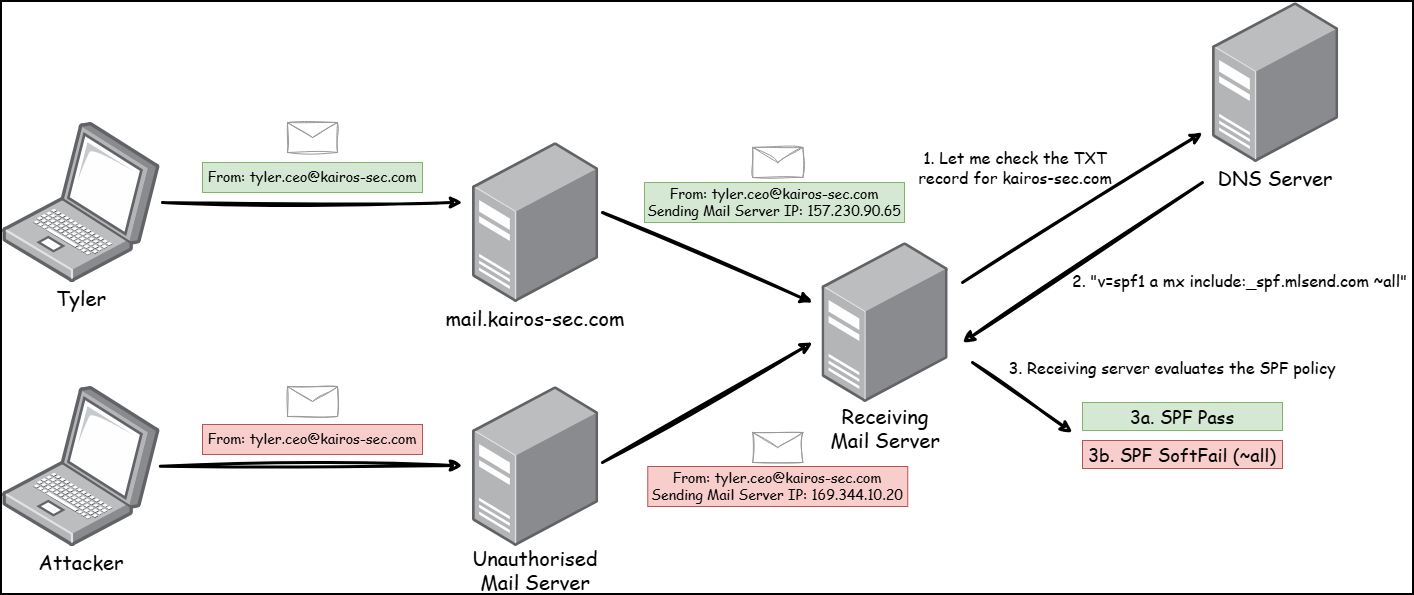
So how is the SPF record used in practice? Glad you asked! Let’s go through an example:
- An email is sent claiming to originate from
tyler.ceo@kairos-sec.com. - The receiving mail server extracts the sender domain (
kairos-sec.com) and queries its SPF record. - It then checks whether the IP address of the sending mail server is authorised by that SPF record.
- Based on the SPF result (and other controls such as DMARC), the receiving server decides how to handle the email.
On the below diagram, the main takeaway is that because the malicious email is sent via an unauthorised mail server, it does not match the SPF policy, and, as a result, the receiving server produces a SoftFail result (~all):
It’s important to reiterate that the SPF only cares about the sending mail server. As long as an email originates from an authorised server, SPF is happy and it does not care about the message’s contents or the sender’s address.
This is where DKIM comes into play.
DKIM
DomainKeys Identified Mail (DKIM) addresses this problem by allowing domains to cryptographically sign emails using public-key cryptography. Receiving mail servers can verify those signatures and confirm that the email was authorised by the sending domain (authenticity) and the signed portions of it have not been modified (integrity).
To achieve that, DKIM adds a DKIM-Signature header to every signed email. An example is shown below:
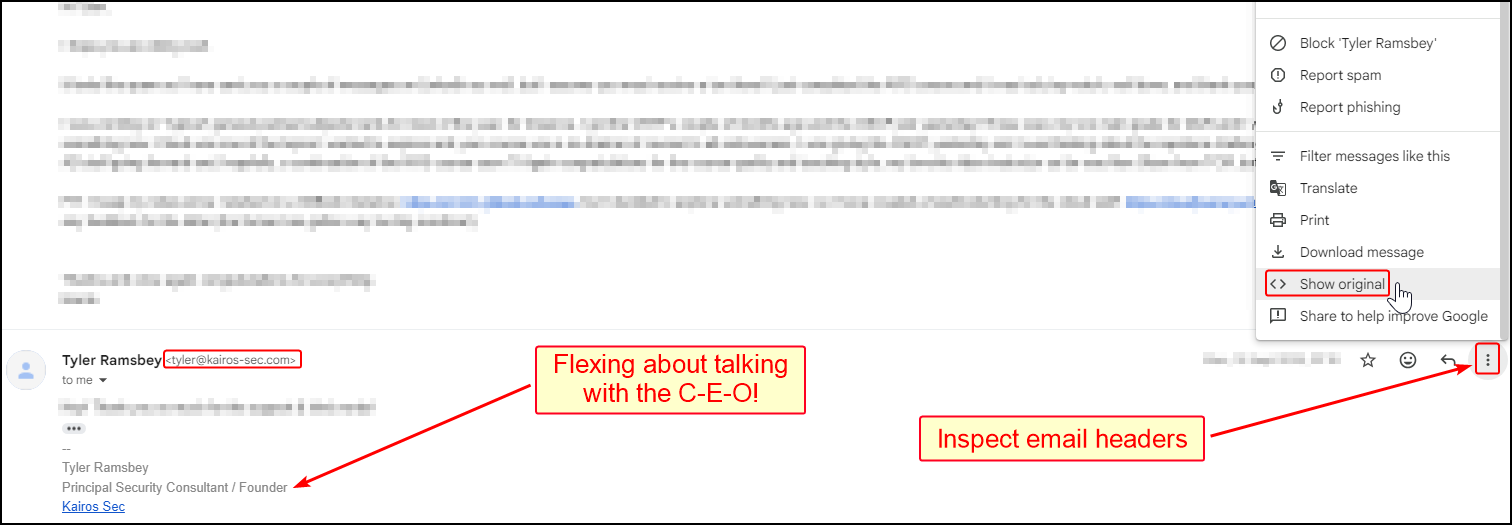

The highlighted fields contain the following information:
| Field | Meaning | Value |
|---|---|---|
a= | Signing algorithm used to generate the signature | rsa-sha256 |
d= | Domain associated with the DKIM signature | kairos-sec.com (ignore the rest) |
s= | DKIM selector used to identify the public key in DNS | 20230601 (timestamp-based) |
h= | List of email headers covered by the signature | 15 signed header entries |
bh= | Hash of the email body | Base64 encoded hash |
b= | Digital signature generated using the sender’s private key | The DKIM-Signature that is being verified |
It is worth noting that if any of the 15 signed header entries included in the h= field are modified in transit, the signature validation will fail because the receiving mail server will compute a different hash than the one originally signed. As these entries cover most of the headers that define the email, even seemingly minor changes can invalidate the signature.
To perform this validation, the receiving mail server must obtain the public key corresponding to the private key that was originally used to generate the signature. Rather than publishing a single key, domains can maintain multiple DKIM key pairs simultaneously (e.g. for key rotation or different email providers).
This is achieved using a selector, a label included within the DKIM-Signature header that tells the receiving mail server where to find the appropriate public key in DNS. The selector often has a common value (e.g. selector1 or default), but that’s not mandatory; these are just naming conventions adopted by the industry.
The selector shown above (
20230601) comes from an old email and follows a timestamp-based naming convention. This selector no longer exists in DNS as the corresponding key has since been rotated. Therefore, for the remainder of this section, we will use the currently active selector (default).
Once the selector is known, the receiving mail server knows which DNS record contains the public key:

The record consists of the following components:
| Component | Meaning |
|---|---|
v=DKIM1 | DKIM version identifier |
k=rsa | Key type |
p= | Public key used for signature verification |
Okay, enough playing with the alphabet for now! Let’s see how the end-to-end DKIM authentication flow looks like:
- The sending mail server computes a hash of the email and signs it using its private key.
- The receiving mail server obtains the email which includes the
DKIM-Signature. - It uses the
selectorto download the corresponding public key from DNS. - It then hashes the message, verifies the signature using the public key, and compares the results.
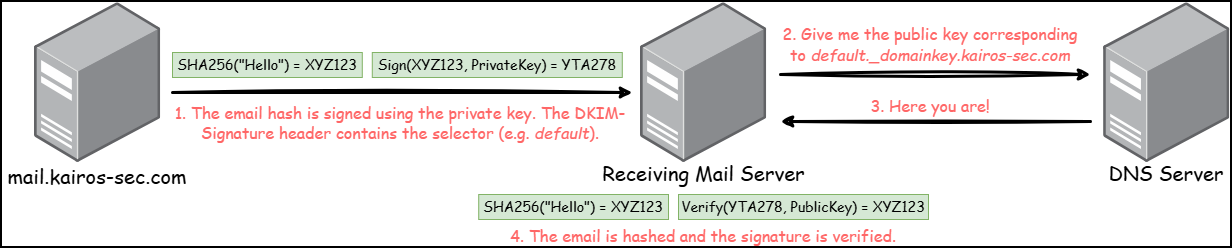
It is important to note that the presence of a valid DKIM record only confirms that the domain can support DKIM signature validation. It does not guarantee that DKIM is actually implemented. To validate that, we need to inspect the Authentication-Results section of the email headers and verify that the signature was successfully checked:

The dkim=pass result confirms that the receiving mail server successfully validated the DKIM signature using the public key associated with the selector 20230601 (still using the old email as an example!).
To recap: SPF checks if the sending mail server is authorised, while DKIM verifies the authenticity and integrity of the email itself. But none of them answers the following question: what happens when authentication fails?
This is the role of DMARC.
DMARC
Domain-based Message Authentication, Reporting, and Conformance (DMARC) builds on top of SPF and DKIM by introducing policy enforcement. Domain owners can publish a DMARC record that instructs receiving mail servers how emails that fail authentication checks should be handled. DMARC records are stored as TXT records under the _dmarc subdomain.
Unfortunately, kairos-sec.com does not have a DMARC policy, thus, we’ll need to change domains for this section:

Let’s try its closest competitor, hackthebox.com:

The most relevant DMARC fields from the above record are:
| Component | Meaning |
|---|---|
v= | DMARC version identifier |
p= | Policy for the primary domain |
pct= | Percentage of messages the policy applies to |
rua= | Address used for aggregate reports |
fo= | Conditions that trigger forensic reports |
sp= | Policy applied to subdomains |
The most important among them is the policy field (p=). This determines how receiving mail servers should handle emails that fail authentication checks. It can have three values:
| Policy | Behaviour | Use Case |
|---|---|---|
none | Monitor only; do not enforce | Initial deployment, testing, and collecting DMARC reports |
quarantine | Treat messages as suspicious (e.g. spam folder) | Gradual enforcement while reducing the risk of blocking legitimate emails |
reject | Reject unauthorised messages outright | Mature email environments with well-understood sending infrastructure |
A domain using p=reject with pct=100 instructs receiving mail servers to apply the policy to all messages and reject those that fail DMARC evaluation. This provides the strongest protection against spoofing attempts. The hackthebox.com domain currently uses a more relaxed policy (quarantine), which still provides protection against spoofing while reducing the likelihood of legitimate emails being rejected due to authentication issues.
To recap once again: SPF authorises mail servers, DKIM verifies the email’s authenticity and integrity, and DMARC handles authentication failures. None of them cares about protecting the SMTP connection itself.
To address this aspect, MTA-STS comes to the rescue; our final piece of the puzzle!
MTA-STS
Mail Transfer Agent Strict Transport Security (MTA-STS) is a DNS-based mechanism used to enforce Transport Layer Security (TLS) encryption for SMTP connections between mail servers.
Unlike SPF, DKIM, and DMARC, which focus on authentication and spoofing prevention, MTA-STS is concerned with protecting email in transit. This helps protect email delivery from STARTTLS downgrade and Adversary-in-the-Middle (AitM) attacks that attempt to disable TLS and force plaintext communication.
Let’s see how the MTA-STS record of the hackthebox.com domain is configured:
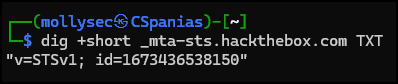
The record consists of the following fields:
| Component | Meaning |
|---|---|
v=STSv1 | MTA-STS version identifier |
id= | Policy version identifier used to signal policy updates |
The presence of this record indicates that the domain advertises support for MTA-STS. However, unlike SPF, DKIM, and DMARC, the actual MTA-STS policy is not stored directly in DNS. Instead, it must be hosted separately over HTTPS at https://mta-sts.<domain>/.well-known/mta-sts.txt.
Unfortunately, although hackthebox.com publishes an MTA-STS record, the corresponding policy file was not accessible at the time of writing. As a result, we cannot fully validate the deployment.
To see what an MTA-STS policy looks like in practice, let’s use google.com:
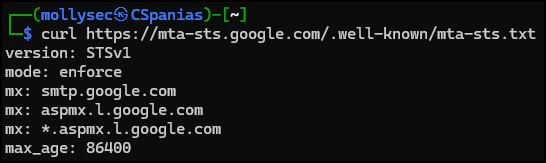
The policy consists of the following fields:
| Component | Meaning |
|---|---|
version | MTA-STS version |
mode | Enforcement mode |
mx | Authorised mail servers |
max_age | Policy validity period (seconds) |
The crucial field here is the mode, which determines how strictly the policy is enforced:
| Mode | Behaviour | Use Case |
|---|---|---|
none | Policy published but not enforced | Initial deployment |
testing | Reports failures without enforcing requirements | Validation and monitoring |
enforce | Require TLS and trusted MX hosts for delivery | Production deployment |
A domain configured with mode: enforce instructs compatible sending mail servers to deliver email only over validated TLS connections and only to the hosts listed in the policy. This provides strong protection against STARTTLS downgrade and SMTP AitM attacks.
In practice, MTA-STS is less commonly found than SPF, DKIM, or DMARC due to the additional operational overhead (DNS configuration and an HTTPS-hosted policy). As a result, many companies simply rely on the opportunistic TLS provided by their email platform and do not deploy MTA-STS at all.
Let’s recap (for one final time, I promise!) what we have seen so far:
| Component | Purpose | Secure | Acceptable | Red Flag |
|---|---|---|---|---|
| SPF | Verifies authorised sending mail servers | -all | ~all | +all |
| DKIM | Verifies authenticity and integrity | dkim=pass | dkim=pass | Missing/Failing |
| DMARC | Defines what to do when authentication fails | reject | quarantine | none |
| MTA-STS | Enforces TLS to protect emails in transit | enforce | testing | none |
Congratulations, you now know about all the components of modern email security!
Email Spoofing
So far, we have discussed the controls used to protect domains against email impersonation. But we haven’t (clearly) answered the original question: Why a spoofed email gets accepted in the first place?
Consider an attacker attempting to send the following email:
From: tyler.ceo@kairos-sec.com
To: victim@company.com
Subject: Urgent payment request
Although the email appears to originate from kairos-sec.com, it is sent from infrastructure that is neither authorised by the domain nor under its control.
Whether this email is accepted, quarantined, or rejected depends on the domain’s SPF, DKIM, and DMARC settings:
| No Email Authentication | SPF & DKIM Only | Full Protection | |
|---|---|---|---|
| SPF | +all | ~all or -all | -all |
| DKIM | - | dkim=pass | dkim=pass |
| DMARC | none | none | reject |
| Result | May be delivered | May be delivered or flagged | Rejected |
The crucial point is that SPF and DKIM alone are not enough. They allow receiving mail servers to detect authentication failures, but only DMARC determines how those failures should be handled.
While the likelihood of successful spoofing can often be inferred from SPF, DKIM, and DMARC configuration, ideally, we need to test how receiving mail systems behave in reality.
Controlled spoofing attempts can be performed using tools such as postfix and swaks:
# Start local SMTP server
sudo systemctl start postfix

# Send spoofed email
swaks \
  --to victim@company.com \
  --from tyler.ceo@kairos-sec.com \
  --server localhost \
  --header "Subject: Spoof Test" \
  --body "This is a controlled assessment."

# Stop SMTP server
sudo systemctl stop postfix
The objective is not to deliver a malicious payload, but rather to determine whether recipient mail systems correctly enforce the protections identified during the assessment.
Automating the Process with Email-Audit
Assessing everything manually is great (and highly recommended!) for understanding how email authentication works, but it quickly becomes repetitive, especially when reviewing multiple domains during the same assessment.
To save myself some time, I developed (vibe-coded with my pal Copilot) email-audit, a script that automates the same process we have followed throughout this article. Keep in mind that the goal was to develop a primarily educational tool that can be also used in practice and not the other way around.
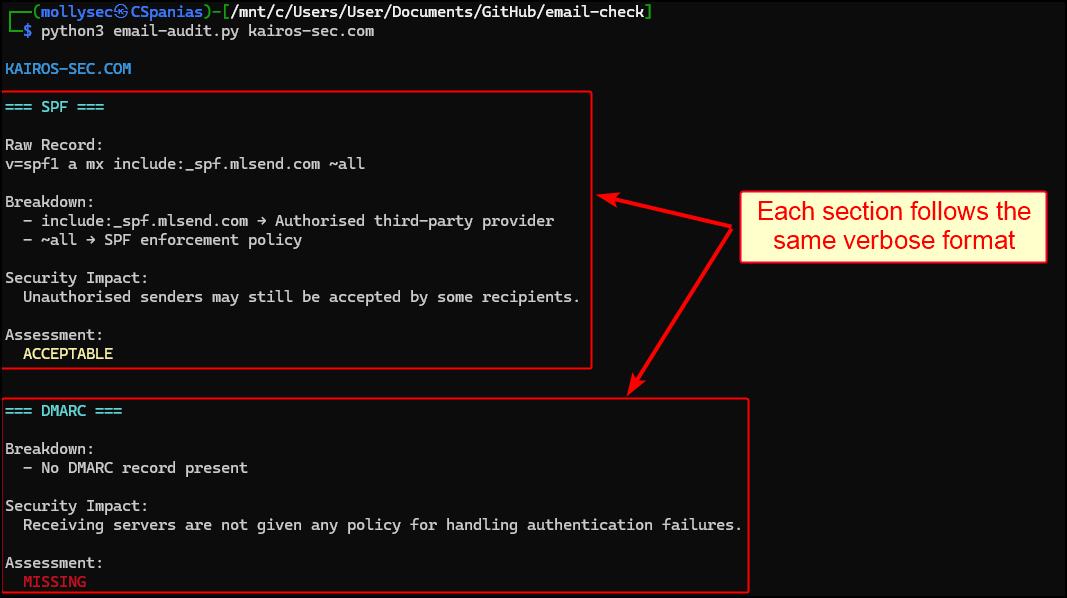
As such, I intentionally kept the output verbose. Instead of displaying just raw records, the tool breaks down each field, explains its purpose, and provides a brief assessment of its security implications.
At the time of writing, it supports DNS-based analysis of SPF, DKIM, DMARC, and MTA-STS:
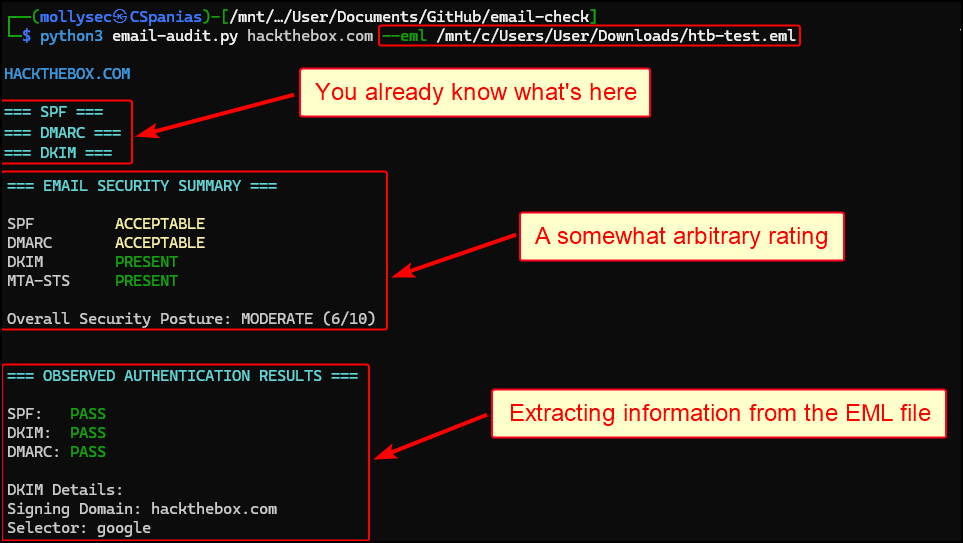
Validation of authentication results from exported .eml files (remember the dkim=pass check!):
And controlled spoofing assessments using a local SMTP relay:
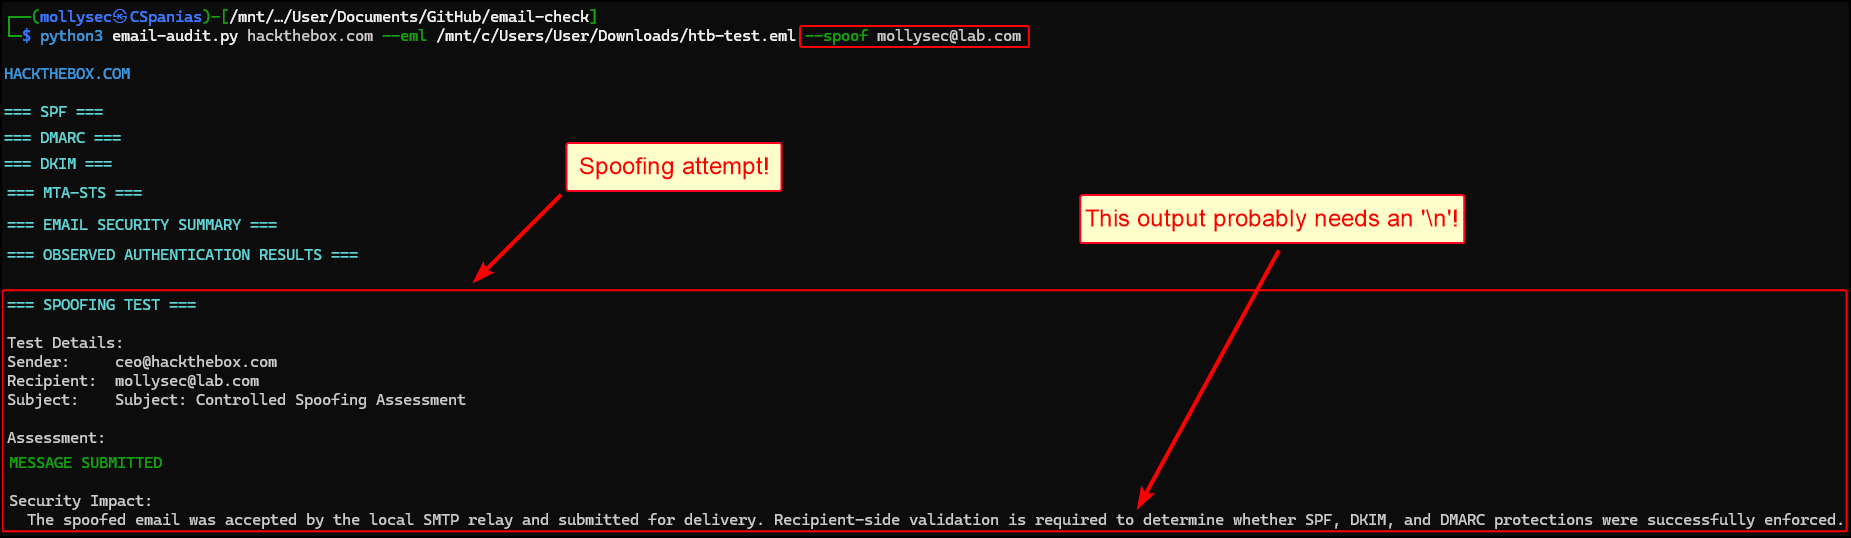
This allows email security controls to be evaluated from both a configuration and practical validation perspective.
Conclusion
Email security is often overlooked during offensive security training, despite being a common (and interesting if you ask me!) component of both pentesting and real-world threats. Throughout this article, we have seen how SPF, DKIM, DMARC, and MTA-STS protect against email spoofing, message tampering, and insecure mail delivery, and why effective mail security depends on their combined use.
Instead of a “typical” mitigation section, here is a final (yes, I lied!) recap:
| Control | Recommendation | Usage |
|---|---|---|
| SPF | -all or ~all | Verifies authorised sending infrastructure |
| DKIM | dkim=pass | Verifies authenticity and integrity |
| DMARC | p=reject or p=quarantine | Defines how authentication failures should be handled |
| MTA-STS | mode: enforce | Protects email in transit |